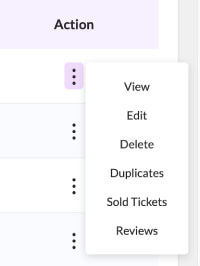
- View: Opens the single event page to view details.
- Edit: Allows editing of the specific event page.
- Delete: Deletes the selected event. Bulk action options are also available for deleting single or multiple events simultaneously.
- Duplicate: Quickly duplicates an event. Simply click this option to create a copy of the event.
- Sold Tickets: Displays detailed information about tickets sold for the event.

- Reviews: Users can provide reviews and ratings for events directly from their dashboard. All submitted reviews will be displayed in this section, organized by event, for easy management and reference.
How to provide a review, please click in here.


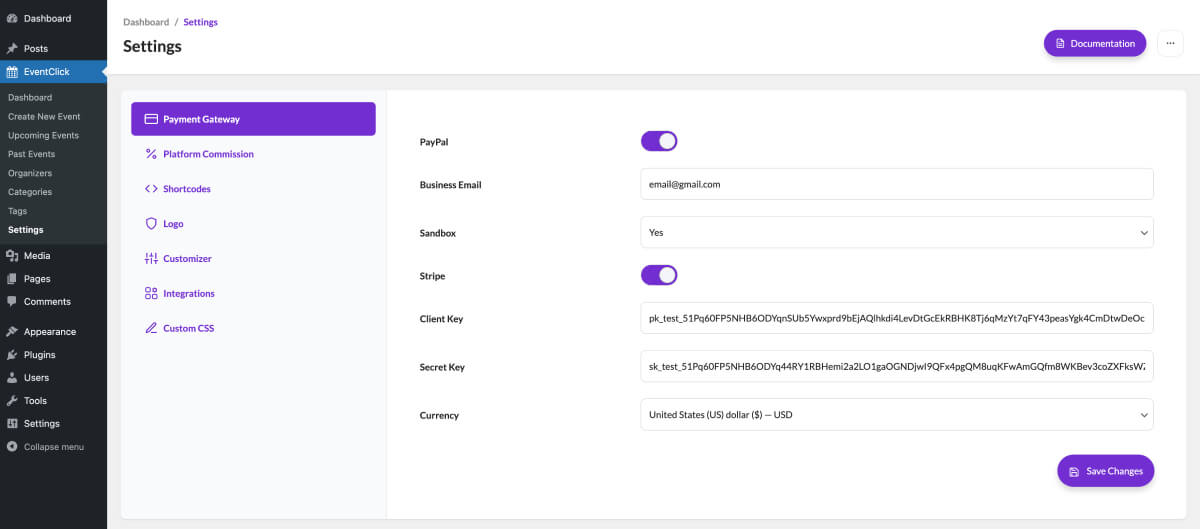
Payment Gateway Configuration:
EventClick simplifies transaction management by integrating payment options with Stripe and PayPal.
To configure all settings for EventClick, navigate to EventClick → Settings → Payment Gateway.
In the Payment Gateway section, you can enable PayPal and Stripe payments. Once enabled, provide all the necessary information required for each payment gateway to ensure smooth transactions.
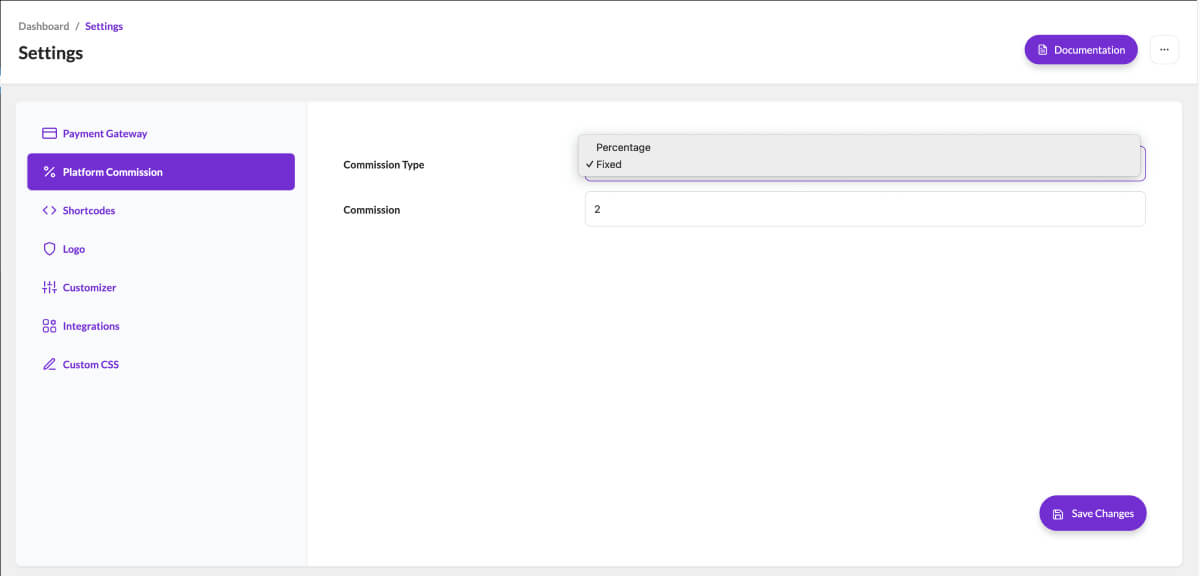
Platform Commission:
The Platform Commission settings allow administrators to configure how the platform charges commission on transactions. This section provides two key fields to customize the commission:
- Commission Type: This dropdown menu lets you choose the type of commission to apply. The available options are:
– Fixed: A fixed monetary amount is charged per transaction.
– Percentage: A percentage of the transaction amount is charged as commission. - Commission: This input field defines the value of the commission based on the selected commission type:
– If Fixed is selected, enter the fixed amount to be charged (e.g., `2` for a $2 fixed commission).
– If Percentage is selected, enter the percentage to be charged (e.g., `10` for a 10% commission).
Save Changes: After configuring the commission settings, click the Save Changes button at the bottom right to apply and save your updates.
- Commission Type: This dropdown menu lets you choose the type of commission to apply. The available options are:
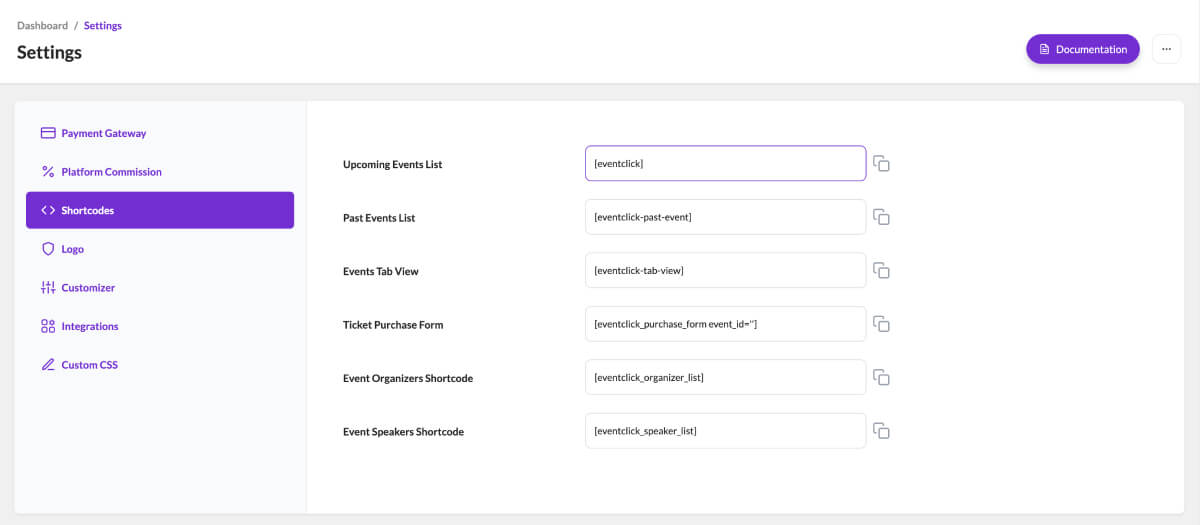
Shortcodes:
EventClick provides a variety of shortcodes for displaying event-related content on your WordPress site. Below is a list of available shortcodes and their usage.
Upcoming event listing:
Display a list of upcoming events. In the page add this shortcode. [eventclick]
Past event listing:
Display a list of past events. [eventclick-past-event]
Events tab view:
Display events in a tabbed layout for easy navigation between upcoming and past events. [eventclick-tab-view]
Ticket purchase Form:
Display a ticket purchase form for a specific event. Replace event_id with the ID of the event. [eventclick_purchase_form event_id=”]
Event Organizers Shortcode:
Display a list of event organizers. [eventclick_organizer_list]
Event Speakers Shortcode:
Display a list of event speakers. [eventclick_speaker_list]
Logo:
This logo only allows for invoice and ticket download files.
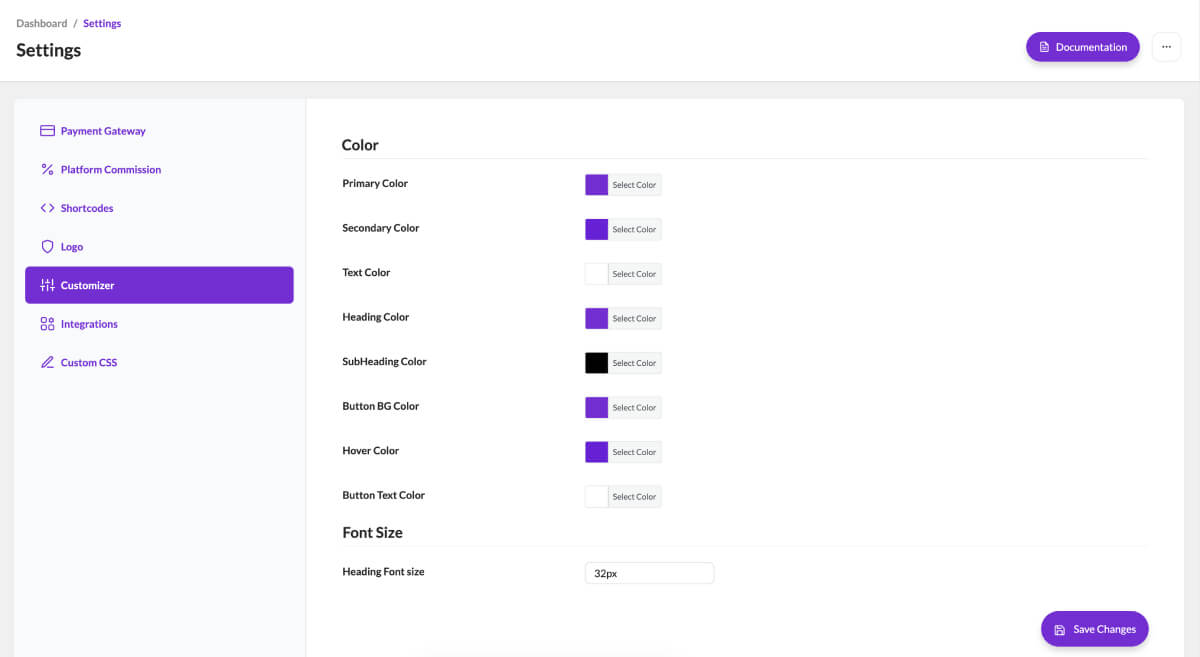
Customizer:
EventClick plugin all frontend view style customize handle in here.
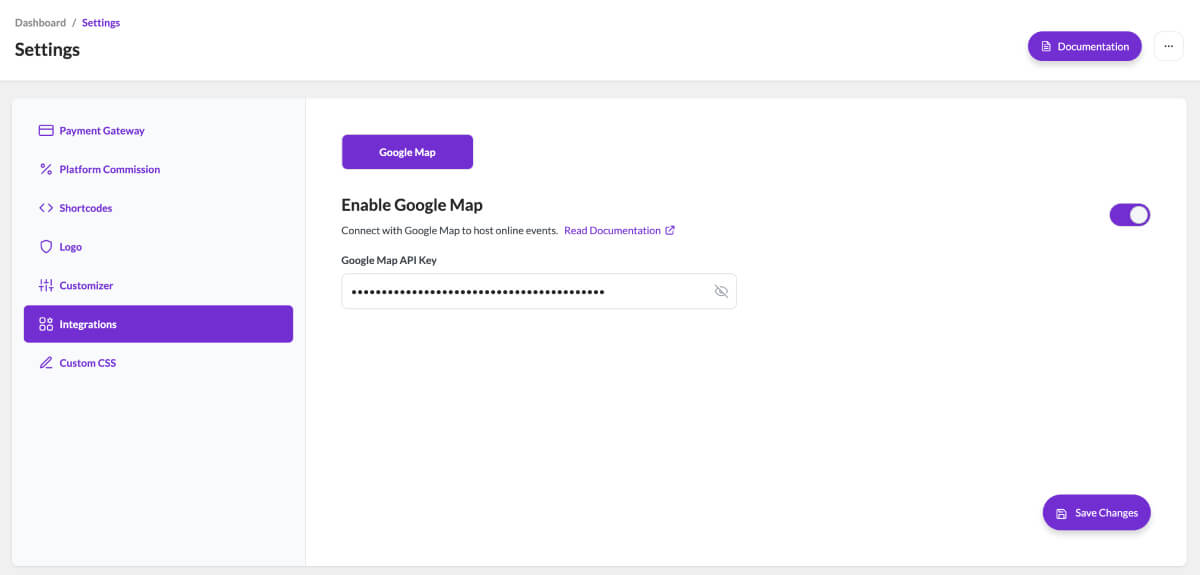
Integrations:
The Google Map Integration settings allow administrators to enable and configure Google Maps for their platform, facilitating location-based features such as hosting online events.
- Enable Google Map: Toggle this switch to enable or disable the Google Map functionality.
– On: Enables the integration and allows Google Maps to function on the platform.
– Off: Disables the integration, hiding or removing Google Map features. - Google Map API Key: This input field is used to enter your Google Map API Key.
– Ensure you have a valid API key from the Google Cloud Console.
– Enter the key in the provided field.
– Use the eye icon next to the input field to toggle the visibility of the entered API key for confirmation.
Save Changes: Once you’ve enabled Google Maps and entered the API key, click the Save Changes button at the bottom right to apply and save your settings.
- Enable Google Map: Toggle this switch to enable or disable the Google Map functionality.
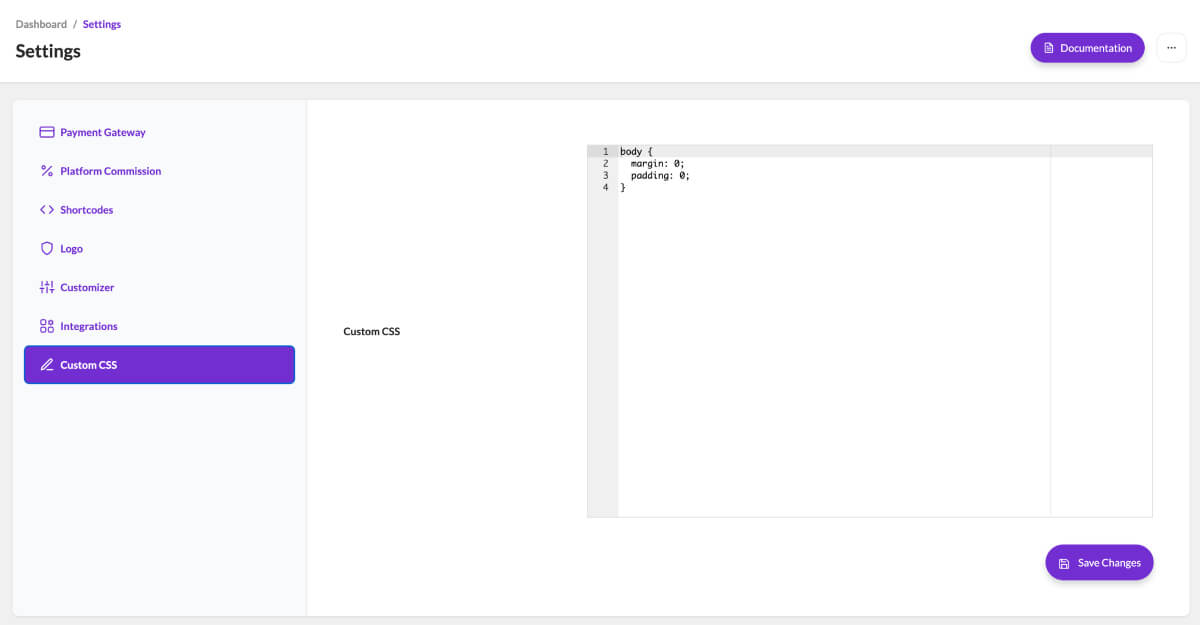
Custom CSS:
If you want to write custom css. And then this panel allow to write your custom css.
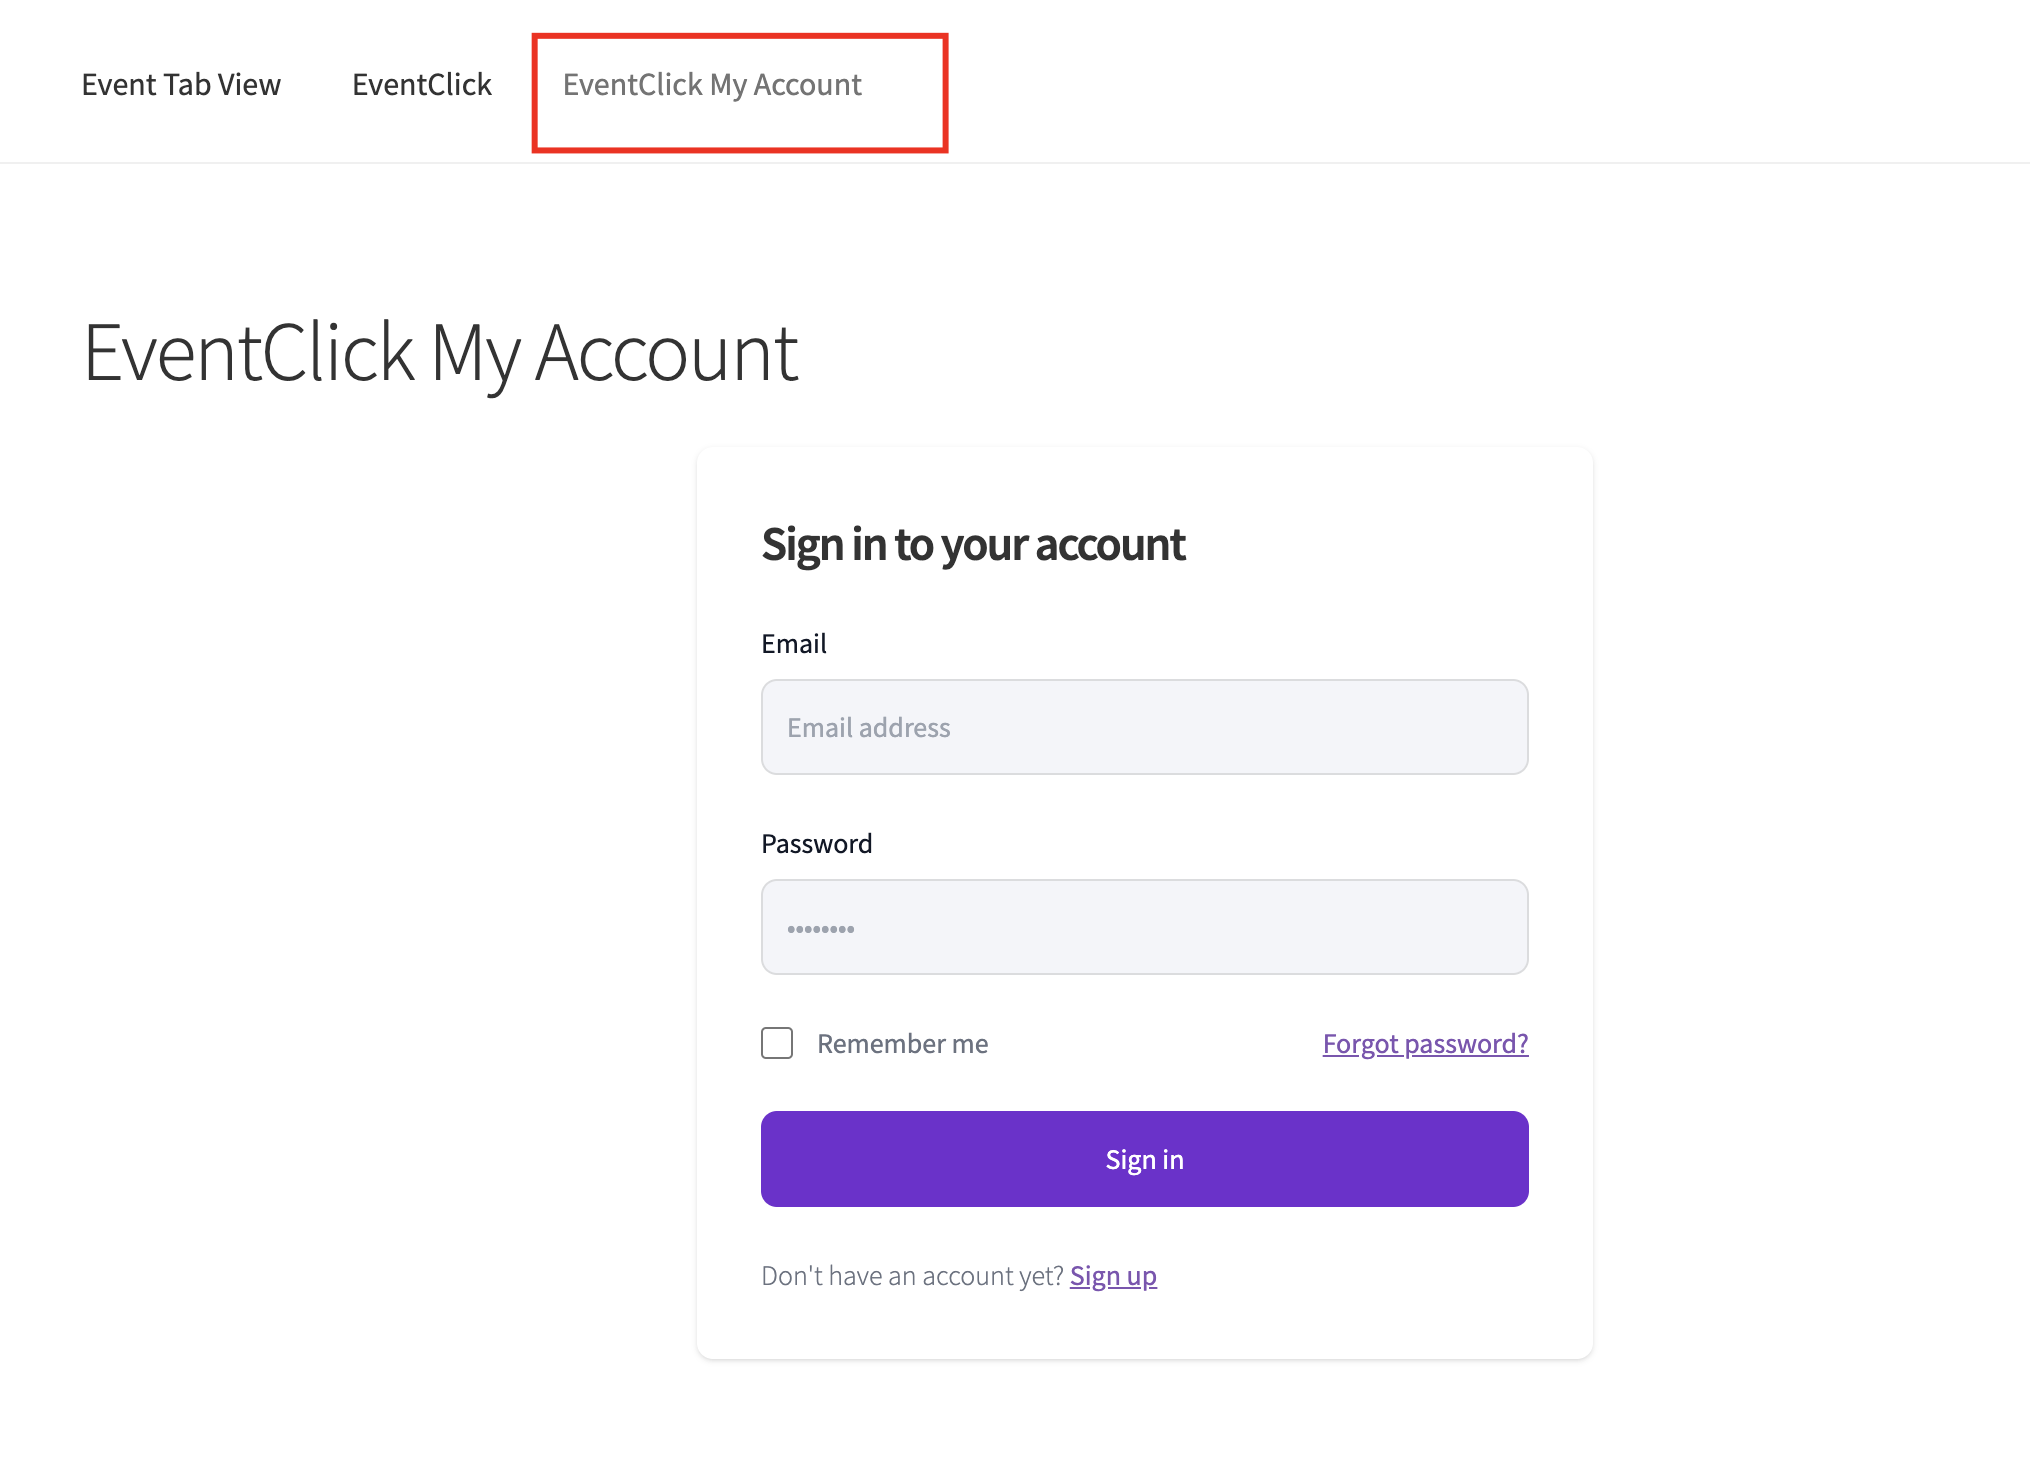
EventClick Login and Register page
After installing the EventClick plugin, the “EventClick My Account” page will be automatically generated. This page serves as the login and registration page, allowing users to easily log in or register for an account.
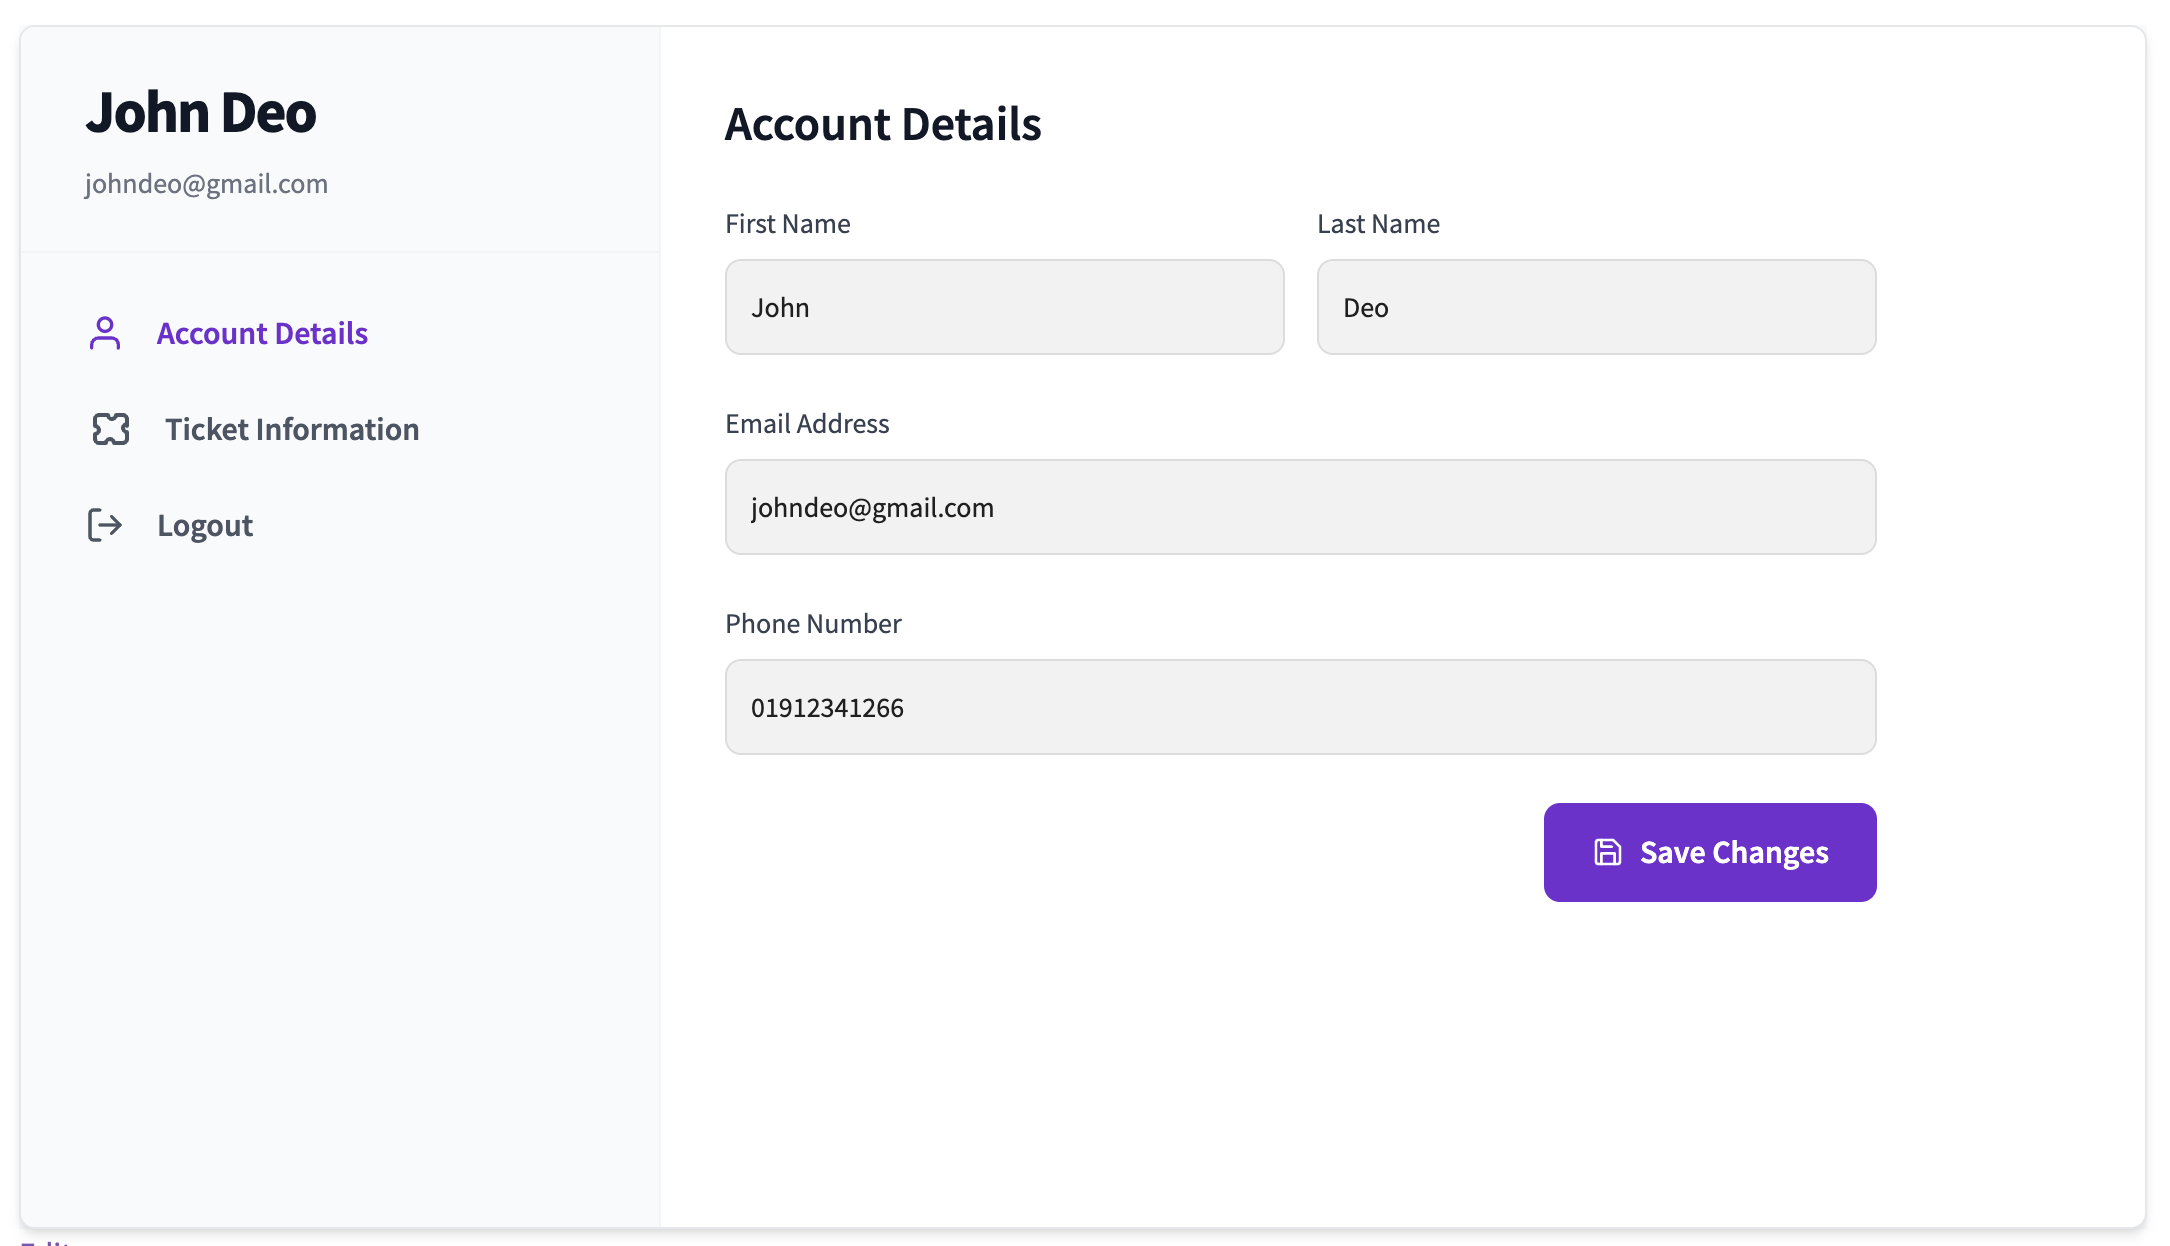
Once logged in, users will gain access to their personalized User Dashboard, where they can manage their events, tickets, and other account details.
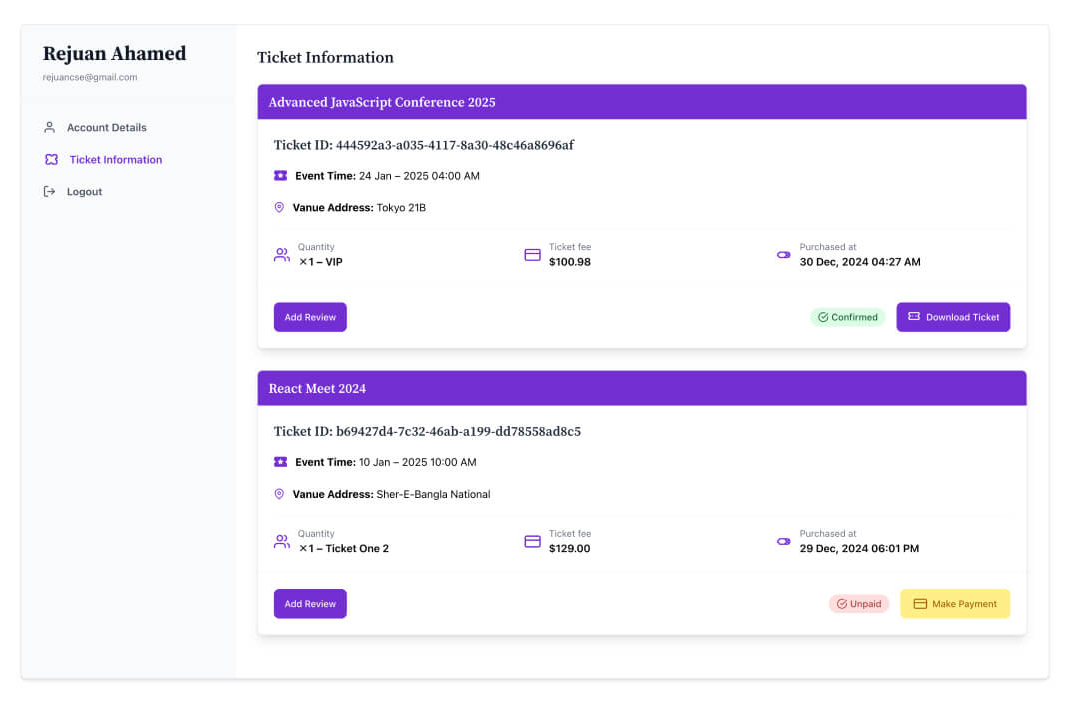
The Ticket Information
The Ticket Information section of the user dashboard provides users with detailed insights about their purchased event tickets. Below is a breakdown of the features and functionalities available in this section: Displays a list of purchased tickets with detailed information for each event.
Ticket Details
Each ticket entry includes the following information:
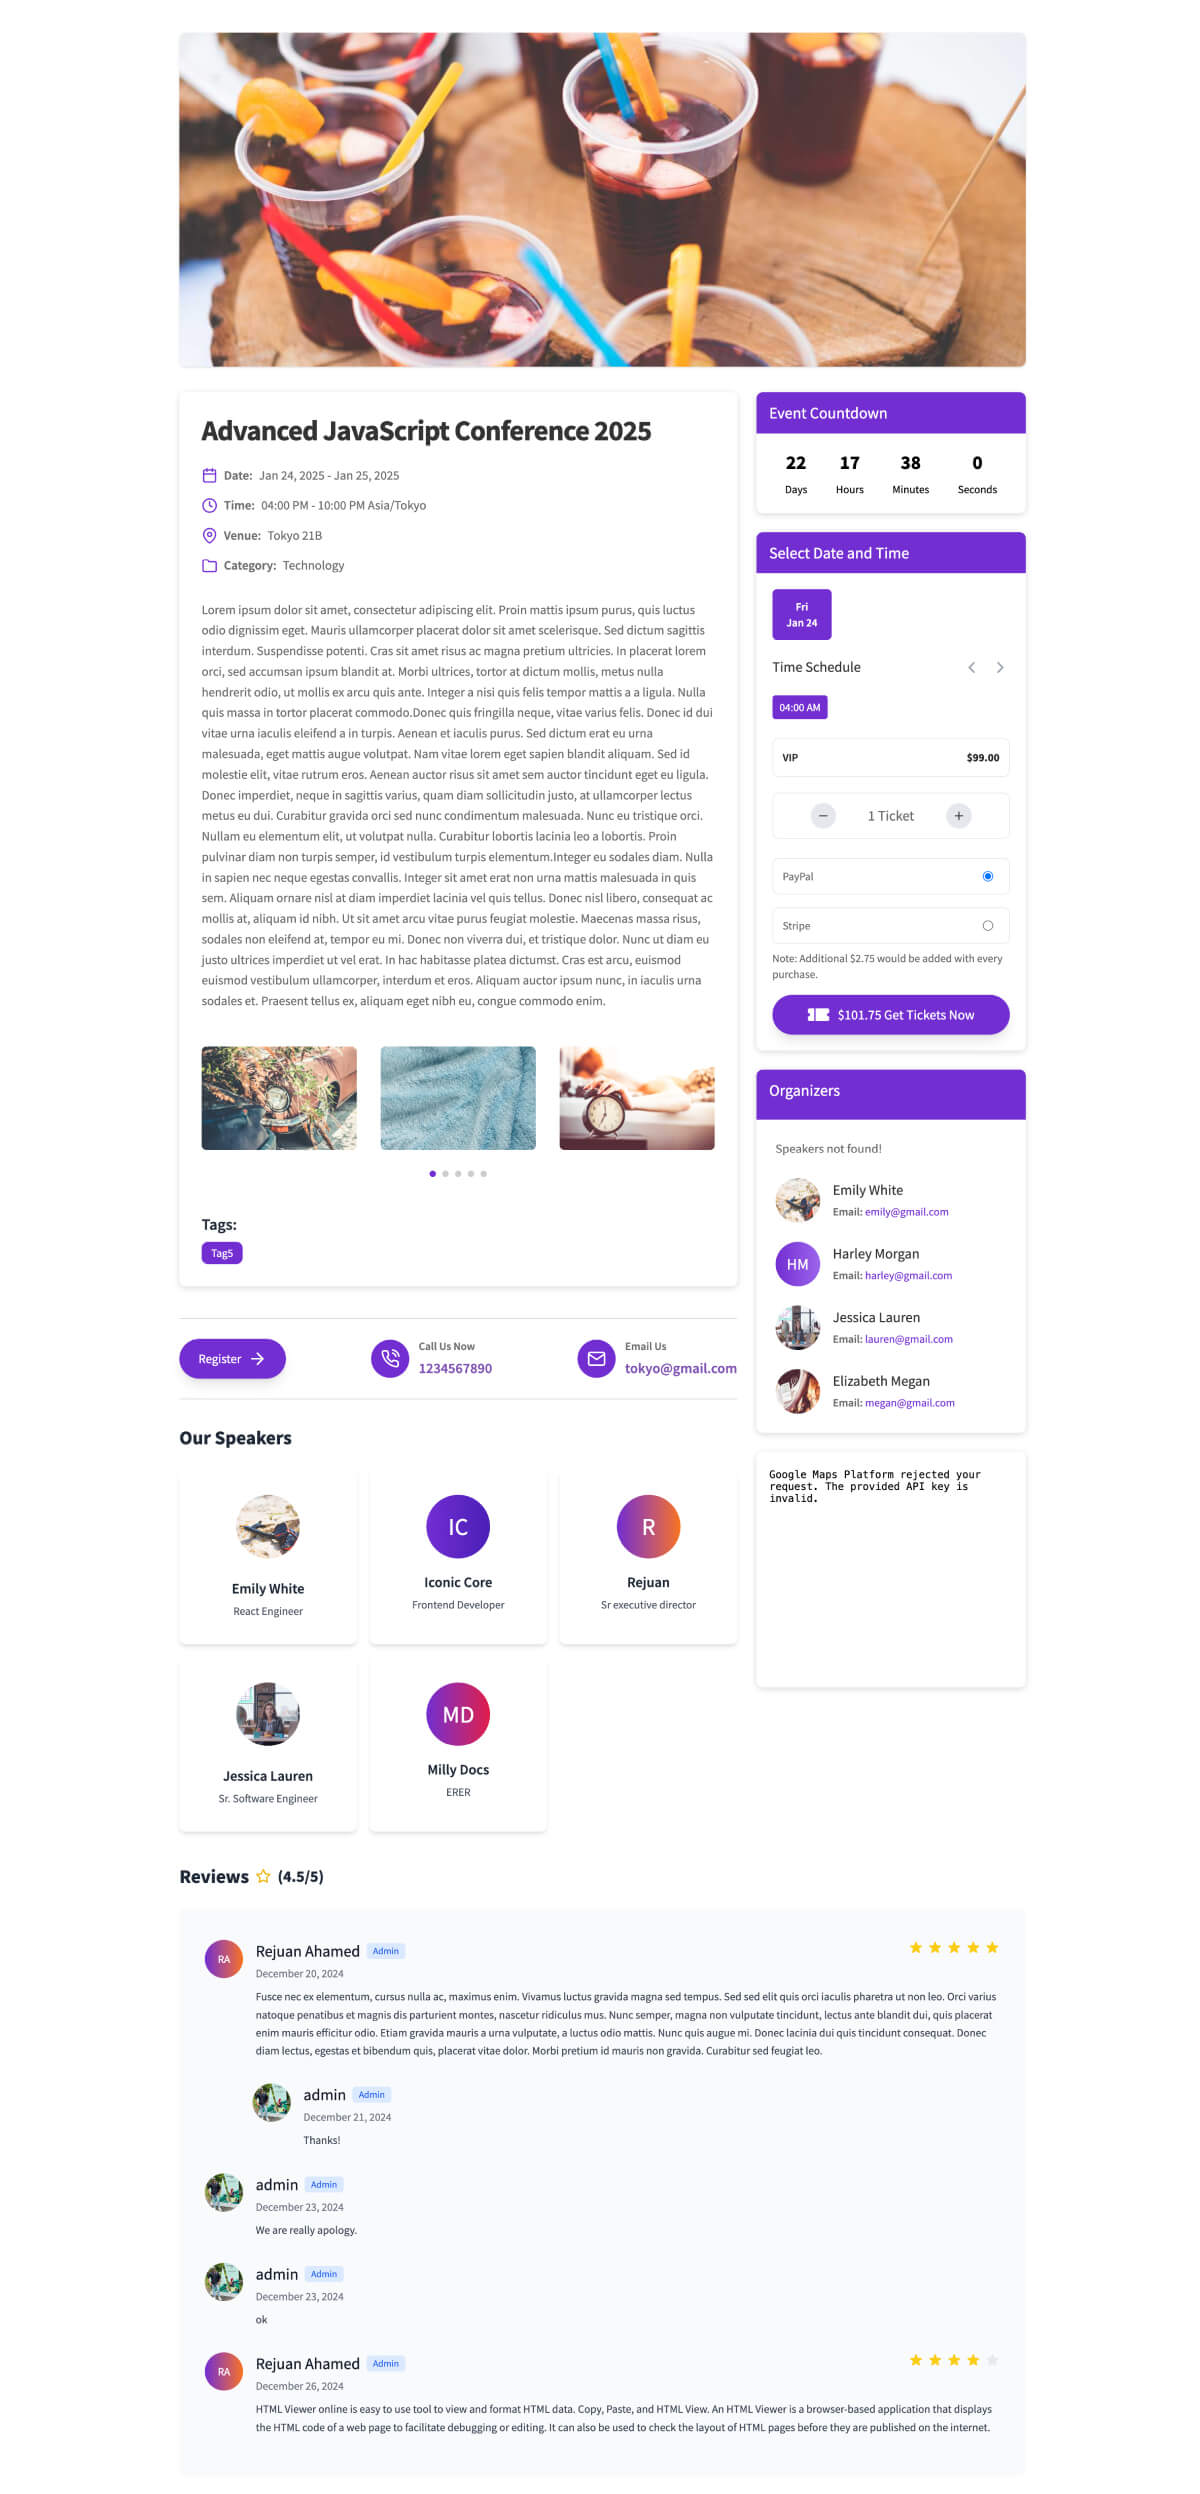
- Event Name: The title of the event (e.g., “Advanced JavaScript Conference 2025”).
- Ticket ID: A unique identifier for the ticket.
- Event Time: The scheduled date and time of the event.
- Venue Address: The location where the event will take place.
- Quantity and Ticket Type: Displays the number of tickets purchased and the type (e.g., “X1 – VIP”).
- Ticket Fee: The total cost of the ticket(s).
- Purchase Date: The exact date and time when the ticket was purchased.
Ticket Status
Each ticket includes a status indicator:
- Confirmed: Indicates the ticket has been successfully purchased.
- Unpaid: Highlights tickets that are reserved but not yet paid for.
Available Actions
- For each ticket, users can perform the following actions:
- Download Ticket (For Confirmed Tickets):
- A button allows users to download the ticket as a PDF or other supported format.
- Make Payment (For Unpaid Tickets):
- Redirects users to a payment gateway to complete the purchase.
- Add Review:
- Provides an option to submit feedback or review for the event after attending.
Event Single Page
Each event has a dedicated page displaying comprehensive details. On this page, users can:
- Purchase Tickets: Buy event tickets easily with integrated payment options via PayPal and Stripe.
- Select Specific Time: Choose a preferred time for the event, if applicable.
- Event Information: View all event-related details, including the agenda, location, and schedule.
- Speaker and Organizer Lists: See a complete list of speakers and organizers associated with the event.
- This detailed page ensures users have all the information they need to participate in the event.